Universal Two Factor internals

I've been a fan of Yubikeys for many years as hardware key storage for GPG and x509 signing keys. They also have a WebAuthn mode that works with websites as a Universal Two Factor (U2F) with many interesting properties:
- Phishing attacks don't work since the URL is used as part of the key
- Per-website keys are generated through ECC math, rather than requiring lots of storage on the device
- User presence detection means that software-only attacks can't log in
- Websites can't link the accounts using the same token (without your authorization)
As of OpenSSH 8.2, you can now generate "Security Key" enrolled identities and use the U2F tokens to authenticate your sssh sessions.
There are some useful guides for setting up U2F ssh and a wonderful interactive WebAuthn explorer from auth0 that walk through some of the process, as well as the very detailed spec. However, the intros elide some of the details of exactly what is stored where and how the various messages are computed, and the spec gets too deep into the weeds, so that is what this attempts to explain the cryptographic operations that are performed.
Note
This document often refers to Yubikeys, although there are many other FIDO2/U2F security keys that work with this protocol. The open source Solokeys also work with all of the steps described here. The Solokeys are interesting since the u2f source code is available for review.
Eliptic Curve Cryptography

The ability to generate per-site keys depends on an interesting property of Elliptic-curve cryptography: almost any random number is valid ECC private key. Unlike RSA that requires primality tests and extensive searching for a valid private key, the output of a strong hash function like SHA256 is nearly guaranteed to be a valid ECC key. This allows the security keys to derive a per-site key by applying the HMAC function to a single secret stored in the device, along with the website name and user id, or similar identifying values.
This means that the security key does not need to store any per-site specific information since it can re-derive the key for the site when logging in, based on the site domain name and user id that are provided by the site. It also prevents linkability, since the key derived for a different user id on the same site will be different. And it prevents phishing with fake domains, since the web browser will send the actual domain name to the security token for key generation, so the fake domain can't generate the other domain's key.
The security token's secret and the site-specific derived private key never leave the device. The generate credential command generates the public key from the private key and exports it, however, allowing the device to prove that it knows the private key.
Note
In 2020 Yubico changed the way the the per-site keys are derived.
In older versions of that page,
the ECC HMAC technique is described, but now the keys use an authenticated
AES CCM mode. This allows the hardware device to ensure that the
credentialId was generated by the relying party, and allows a device
reset to generate a new primary key encryption key.
The Solokeys u2f_make_auth_tag() appears to still use the HMAC technique.
WebAuthn
The wonderful interactive WebAuthn explorer from auth0, the colorful guide from DUO, and the u2f protocol details from Yubico are the best places to start. The Web Authentication API at MDN is also a useful reference.
There are essentially three parties involved: the server, the user's web browser, and the security key. The user trusts the web browser to properly implement the protocol, but does not trust it with the keys. The server doesn't trust the web browser.
To test out these examples, you can open the Developer Tools and copy the Javascript into the console.
Enroll
 (Image from auth0's u2f introduction site)
When enrolling a new key for a user on a server, the server sends javascript
to the user's web browser that calls navigator.credentials.create() with
the user id that is trying to login (called "user info"), the domain of the
website (called the "relying party" or "rp"),
and a server-provided nonce (called the "challenge") to protect against replay attacks.
Note that this demo uses a client-side generated challenge -- that
is not secure and for real applications it must generated on the server side!
cred = await navigator.credentials.create( {
    publicKey: {
        rp: {
            id: "trmm.net",
            name: "WebAuthN Demo at trmm.net",
        },
        user: {
            id: new TextEncoder().encode("abcdef"),
            name: "foo",
            displayName: "Foo Bar",
        },
        challenge: new TextEncoder().encode("012345678"),
        pubKeyCredParams: [{
            type: 'public-key',
            alg: -7,
        }],
    },
} )
Warning
The challenge must be provided by the server, not generated on
the client side as in this example. Otherwise it is subject to replay
attacks.
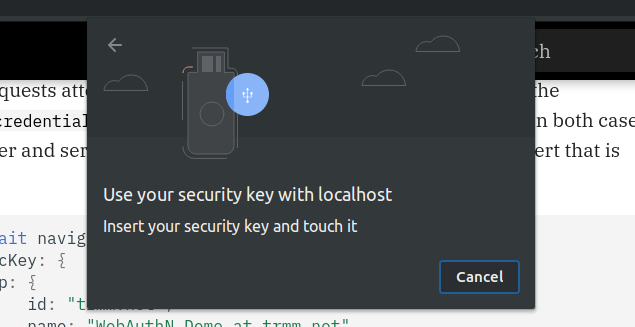
The web browser validates that the relying party matches the website URL,
and then prompts the user for their approval for this website to
talk to their security key. If the user approves, then the browser
sends the challenge, relying party id, and the user info to the token
using the native library fido_dev_make_cred() call to generate a new public key.
The exact details of how the security key derives the site specific key is not
specified, although most tokens use the HMAC key derivation function described
above.
The token responds a PublicKeyCredential object that contains with the derived public key, the signed challenge,
and optionally a x509 certifcate
attesting to the device serial number and manufacturer
(which would defeat the purpose of non-linkability, but might be required
for high assurance sites to validate that the key is stored in an actual
hardware device. See attestsion below for more details).
The public key can be retrieved from the response in a DER formatted binary, converted to hex for easy cut-and-paste:
hex(cred.response.getPublicKey())
"3059301306072a8648ce3d020106082a8648ce3d0301070342000429f2870420fde85debb321a9e6c1c8748928a175cb7e3f883d4de12acaf66e666dcf6593c05a7d07207f2f547f1dcbf69045f355edc4ffd39151173eaa58b247"
This hex string can be converted back to binary with xxd, and then converted
to PEM format with openssl on the command line:
echo 3059301306072a8648ce3d020106082a8648ce3d0301070342000429f2870420fde85debb321a9e6c1c8748928a175cb7e3f883d4de12acaf66e666dcf6593c05a7d07207f2f547f1dcbf69045f355edc4ffd39151173eaa58b247 \
| xxd -p -r \
| openssl pkey \
    -pubin \
    -text \
    -inform DER \
| tee site-key.pem
-----BEGIN PUBLIC KEY-----
MFkwEwYHKoZIzj0CAQYIKoZIzj0DAQcDQgAEG38lHwnNXV7UTdsKBS0+CvBF/b4H
w9gDNef9mwKEyvpsPHJdi99B8oYHb+Huzi1hhicLXkbTIUY17Wu5a1R5tA==
-----END PUBLIC KEY-----
Public-Key: (256 bit)
pub:
    04:1b:7f:25:1f:09:cd:5d:5e:d4:4d:db:0a:05:2d:
    3e:0a:f0:45:fd:be:07:c3:d8:03:35:e7:fd:9b:02:
    84:ca:fa:6c:3c:72:5d:8b:df:41:f2:86:07:6f:e1:
    ee:ce:2d:61:86:27:0b:5e:46:d3:21:46:35:ed:6b:
    b9:6b:54:79:b4
ASN1 OID: prime256v1
NIST CURVE: P-256
The other value in the response is the credentialId, which is the part
that the security key needs to combine with its internal secret to derive
the site specific key for this hostname and user. The site will need to
provide it back to the user's web browser when they want to
log in again.
hex(cred.rawId)
"11d8b121823de78b28e5c68485f02b3f53325ee84e0b1b16caee4622e1db54e21ec4666d10ae8e3a42f332bc31735d514bec184886b1e13e3087555d2d9447ec"
There is other data in the PublicKeyCredential object, although
unfortunately w3c made a series of bizarre decisions and encode the data into CBOR,
and there is not a built-in CBOR decoder in the browser.
(The rationale is that the security tokens are resource constrained devices,
except that they already support a half dozen verbose protocols so it isn't clear if
this is really true)
The paroga/cbor-js library is loaded on the page for decoding the results in the console.
CBOR.decode(cred.response.attestationObject)
> {fmt: "none", attStmt: {…}, authData: Uint8Array(196)}
Since no attestation was requested, the fmt is None and attStmt is empty.
Unfortunately the authData is a packed binary array, so it doesn't have
any useful accessors. It is really like they decided to make this as hard as
possible...
You can pick it apart with the fields discussed in verifying attestation signatures.
At this point the user's web browser sends the public key and the credential to the server, which stores it to go along with the user name.
Attestation
By default, without attestation, there is no way for the server to validate the public key or to ensure that the challenge was used correctly. This seems like an oversight, since a MITM attack could substitute a different key, or a browser extension could hijack the challenge and relying party ids, but since non-linkability was a goal.
If the site requests attestation, it can add an attestation parameter
to the navigator.credentials.create() request, either direct or indirect.
In both cases the manufacturer and serial number of the token are revealed in the
x509 cert that is produced.
cred = await navigator.credentials.create( {
    publicKey: {
        rp: {
            id: "trmm.net",
            name: "WebAuthN Demo at trmm.net",
        },
        user: {
            id: new TextEncoder().encode("abcdef"),
            name: "foo",
            displayName: "Foo Bar",
        },
        challenge: new TextEncoder().encode("012345678"),
        pubKeyCredParams: [{
            type: 'public-key',
            alg: -7,
        }],
        attestation: "direct", // "indirect" is also an option
    },
} )
Warning
The challenge must be provided by the server, not generated on
the client side as in this example. Otherwise it is subject to replay
attacks in the real world.
Note
If you run this, you will also have to regenerate the site-key.pem
file from the cred.response.getPublicKey() since the hardware token
will generate a new key since this is might be a new site.
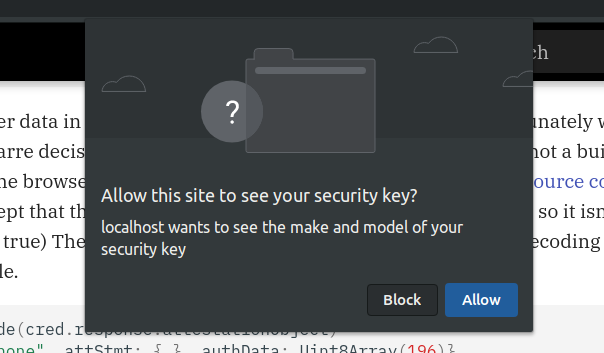
The user will be presented with an additional prompt, indicating that the site has requested the "make and model" of the security key. This tells them that they will be sacrificing the unlinkability properties of their key, so hopefully they understand why the site wants this additional information.
The attestationObject now has more information:
a = CBOR.decode(cred.response.attestationObject)
> attStmt: {sig: Uint8Array(71), x5c: Array(1)}
> authData: Uint8Array(196) [73, 150, ....]
  fmt: "fido-u2f"
The x5c is the x509 certificate in DER format and can be verified on the command line.
Note that the EC key that is included in this cert is the security key's
internal key, not the derived key used for this site.
hex(a.attStmt.x5c[0])
"3082024..."
This hex value can be converted back to binary with xxd and then parsed
by openssl to produce a PEM formatted certificate:
echo 3082024a30820132a0030201020204046c8822300d06092a864886f70d01010b0500302e312c302a0603550403132359756269636f2055324620526f6f742043412053657269616c203435373230303633313020170d3134303830313030303030305a180f32303530303930343030303030305a302c312a302806035504030c2159756269636f205532462045452053657269616c203234393138323332343737303059301306072a8648ce3d020106082a8648ce3d030107034200043ccab92ccb97287ee8e639437e21fcd6b6f165b2d5a3f3db131d31c16b742bb476d8d1e99080eb546c9bbdf556e6210fd42785899e78cc589ebe310f6cdb9ff4a33b3039302206092b0601040182c40a020415312e332e362e312e342e312e34313438322e312e323013060b2b0601040182e51c020101040403020430300d06092a864886f70d01010b050003820101009f9b052248bc4cf42cc5991fcaabac9b651bbe5bdcdc8ef0ad2c1c1ffb36d18715d42e78b249224f92c7e6e7a05c49f0e7e4c881bf2e94f45e4a21833d7456851d0f6c145a29540c874f3092c934b43d222b8962c0f410cef1db75892af116b44a96f5d35adea3822fc7146f6004385bcb69b65c99e7eb6919786703c0d8cd41e8f75cca44aa8ab725ad8e799ff3a8696a6f1b2656e631b1e40183c08fda53fa4a8f85a05693944ae179a1339d002d15cabd810090ec722ef5def9965a371d415d624b68a2707cad97bcdd1785af97e258f33df56a031aa0356d8e8d5ebcadc74e071636c6b110ace5cc9b90dfeacae640ff1bb0f1fe5db4eff7a95f060733f5 \
| xxd -p -r \
| openssl x509 \
    -text \
    -inform DER \
| tee cert.pem
Certificate:
    Data:
        Version: 3 (0x2)
        Serial Number: 74221602 (0x46c8822)
        Signature Algorithm: sha256WithRSAEncryption
        Issuer: CN = Yubico U2F Root CA Serial 457200631
        Validity
            Not Before: Aug  1 00:00:00 2014 GMT
            Not After : Sep  4 00:00:00 2050 GMT
        Subject: CN = Yubico U2F EE Serial 249182324770
        Subject Public Key Info:
            Public Key Algorithm: id-ecPublicKey
                Public-Key: (256 bit)
                pub:
                    04:3c:ca:b9:2c:cb:97:28:7e:e8:e6:39:43:7e:21:
                    fc:d6:b6:f1:65:b2:d5:a3:f3:db:13:1d:31:c1:6b:
                    74:2b:b4:76:d8:d1:e9:90:80:eb:54:6c:9b:bd:f5:
                    56:e6:21:0f:d4:27:85:89:9e:78:cc:58:9e:be:31:
                    0f:6c:db:9f:f4
                ASN1 OID: prime256v1
                NIST CURVE: P-256
        X509v3 extensions:
            1.3.6.1.4.1.41482.2:
                1.3.6.1.4.1.41482.1.2
            1.3.6.1.4.1.45724.2.1.1:
                ...0
    Signature Algorithm: sha256WithRSAEncryption
         9f:9b:05:22:48:bc:4c:f4:2c:c5:99:1f:ca:ab:ac:9b:65:1b:
         be:5b:dc:dc:8e:f0:ad:2c:1c:1f:fb:36:d1:87:15:d4:2e:78:
....
The device's public key is signed by the OEM's private key, in this case Yubico's U2F Device Attestation CA:
wget https://developers.yubico.com/U2F/yubico-u2f-ca-certs.txt
openssl x509 \
    -text \
    -noout \
    -in yubico-u2f-ca-certs.txt
Certificate:
    Data:
        Version: 3 (0x2)
        Serial Number: 457200631 (0x1b4053f7)
        Signature Algorithm: sha256WithRSAEncryption
        Issuer: CN = Yubico U2F Root CA Serial 457200631
        Validity
            Not Before: Aug  1 00:00:00 2014 GMT
            Not After : Sep  4 00:00:00 2050 GMT
        Subject: CN = Yubico U2F Root CA Serial 457200631
        Subject Public Key Info:
            Public Key Algorithm: rsaEncryption
                RSA Public-Key: (2048 bit)
                Modulus:
                    00:bf:8f:06:2e:84:15:65:a9:a8:98:58:43:2c:ad:
...
(Unfortunately right now the Yubico U2F root CA is not signed by any other CA's,
so the chain ends there. The CA cert is signed by Josefsson's personal key 860B7FBB32F8119D, which is a little odd. I've asked them
for clarification)
wget -q https://developers.yubico.com/U2F/yubico-u2f-ca-certs.txt.sig
wget -q -O- https://josefsson.org/54265e8c.txt | gpg --import
gpg: key 0664A76954265E8C: public key "Simon Josefsson <simon@josefsson.org>" imported
gpg: Total number processed: 1
gpg:               imported: 1
gpg --verify yubico-u2f-ca-certs.txt.sig yubico-u2f-ca-certs.txt
gpg: Signature made di 02 sep 2014 11:18:24 CEST
gpg:                using RSA key 860B7FBB32F8119D
gpg: Good signature from "Simon Josefsson <simon@josefsson.org>" [unknown]
gpg:                 aka "Simon Josefsson <simon@yubico.com>" [unknown]
Primary key fingerprint: 9AA9 BDB1 1BB1 B99A 2128  5A33 0664 A769 5426 5E8C
     Subkey fingerprint: 9941 5CE1 905D 0E55 A9F8  8026 860B 7FBB 32F8 119D
The OEM's signature on the cert can be validated with openssl verify
(note that it only works with PEM formatted files, which is why we
had to convert it earlier):
openssl verify \
    -CAfile yubico-u2f-ca-certs.txt \
    -show_chain \
    cert.pem
cert.pem: OK
Chain:
depth=0: CN = Yubico U2F EE Serial 249182324770 (untrusted)
depth=1: CN = Yubico U2F Root CA Serial 457200631
Now that we trust the OEM's CA cert and the OEM's CA signature on the security key's primary key cert, we can use the security key's primary key to validate the signature on the security key's site-specific key that it has just derived. First we have to figure out what is actually signed.
 (Image from the w3c U2F specification)
Signed data is discussed in 6.5 Attestation and 8.6. FIDO U2F Attestation Statement Format. Rather than signing the entire authenticator data section, they've chosen a piecemeal signature, some of which is packed again into CBOR stuff to make it hard to process:
- 0x00 - 0x1F:
rpIdHash= sha256(hostname) Included in signature - 0x20: Flags ED,AT,0,0,0,UV,0,UP
- 0x21 - 0x24:
counter(big-endianuint32_t) - 0x25 - 0x34:
AAGUID, 16-bytes of all zero - 0x35 - 0x36:
credentialIdLength(big-endianuint16_t), usualy 64 - 0x37 - 0x76:
credentialId(device specific value, probably hash of inputs) Included in signature - 0x77 - end: CBOR encoded public key Partially included in signature
The clientDataHash is computed by SHA256 on the clientDataJSON, as defined
in this absurdity.
The server must also generate the exact same client data block so that it can
verify that the correct challenge and rpId are included in the signed data;
otherwise it can't trust the attestation.
The publicKeyU2F is the raw coefficients from the public key, which are stored
in CBOR format inside the packed binary array authData.
Section 8.6 defines that the format for the key is:
- Let
xbe the value corresponding to the "-2" key (representing x coordinate)- Let
ybe the value corresponding to the "-3" key (representing y coordinate)- Let
publicKeyU2Fbe the concatenation0x04 || x || y.
Signature is over 0x00 || rpIdHash || clientDataHash || credentialId || publicKeyU2F,
so let's extract those pieces from the CBOR encoded attestationData and
output it as a hex value for validation:
r = cred.response
a = CBOR.decode(r.attestationObject)
rpIdHash = a.authData.slice(0x00, 0x00 + 0x20)
credIdLen = a.authData[0x35] << 8 | a.authData[0x36]
credId = a.authData.slice(0x37, 0x37 + credIdLen)
pubkey = CBOR.decode(a.authData.slice(0x37 + credIdLen).buffer)
pubkey_x = pubkey[-2]
pubkey_y = pubkey[-3]
clientDataHash = new Uint8Array(await crypto.subtle.digest('SHA-256', r.clientDataJSON))

msg = new Uint8Array([
    0x00,
    ...rpIdHash,
    ...clientDataHash,
    ...credId,
    0x04,
    ...pubkey_x,
    ...pubkey_y,
])
hex(msg)
"0049960de5880e8c687434170..."
hex(a.attStmt.sig)
"3045022100e7f..."
Due to a limitation of the openssl verify, we have to extract the the device's
primary public key from the x509 cert and format it as a PEM file:
openssl x509 \
    -in cert.pem \
    -pubkey \
    -noout \
    > primary-key.pem
Now we can validate the security key's signature on the message on the command line:
echo 0049960de5880e8c687434170f6476605b8fe4aeb9a28632c7995cf3ba831d9763a2bfd7346d6160d1308e163b7dcd9d5242c2b988980071768cb27a564aa211d52cec06d89cd33a79b909995e01cb9c975bb4c0b4a04ad5015ce1dcd4de7f11721b479448b24b834128a5445c4dec9c6d977d12c49297f3f82e2a79cd262058d4042ef7d24dc141f2259bc1470270ae9479bfde1d3ce2f2d32f83df7759a38e57aa5b6d831da586d0db38d8f5f33072528d739fdee3ad37ee3f070bdef377ecbb8c \
| xxd -r -p > msg.bin

echo 3045022100e7f83c6ba1740ae0766a31fed8324563f62bd8bf97731f22e1f1c0112ebcdf8e022034428dc152b0e1e8c513fa5186db4a484503a1ab79bd1f81beb0bfdeebc7f3bd \
| xxd -r -p > sig.bin

openssl dgst \
    -sha256 \
    -verify primary-key.pem \
    -signature sig.bin \
    msg.bin
Verified OK
So the server can now trust that this user's site-specific key was generated in an actual hardware token, and that the parameters match the expected values.
Authenticate
After enrolling the user's security key, the server has stored the
user's password, the hardware token's site-specific public key
and the credentialId value. When the user wants to
login, they first provide their username and password, and the site responds
with its stored credentialId for this user and a server-generated
random nonce (challenge). The user's web browser invokes
navigator.credentials.get() with these values:
auth = await navigator.credentials.get({
    publicKey: {
        challenge: new TextEncoder().encode("0123456789abcdef"),
        allowCredentials: [{
            type: "public-key",
            id: credId,
        }],
        userVerification: "discouraged",
    },
});
Warning
The challenge must be provided by the server, not generated on
the client side as in this example. Otherwise it is subject to replay
attacks in the real world. The server must validate that the signed
message include the challenge that it generated, otherwise a malicious
browser could reuse a prior nonce.
Note
The userVerification: "discouraged" is due to unexpected behaviour with Windows PIN caused by the default value "encouraged".
The web browser invokes the native FIDO2/U2F library call using the
domain name for the rpId and passing in the challenge and credentials.
The hardware token re-derives the per-site private key from its internal
secret and the credential, likely using the key derivation
function described above.
It then signs the challenge
(stored in a serialized JSON format along with the rpId) with this derived private key
{"type":"webauthn.get","challenge":"MDEyMzQ1Njc4YWJjZGVm","origin":"https://webauthn.me","crossOrigin":false}
The browser returns a PublicKeyCredential object with a AuthenticatorAssertionResponse
object that has the signature over the message:
hex(auth.response.signature)
"3045022..."

The messages that was signed is defined in 6.3.3 The authenticatorGetAssertion Operation. The server should be able to generate the exact same block, allowing it to verify that the signed message matches the expected message.
clientDataHash = new Uint8Array(await crypto.subtle.digest('SHA-256', auth.response.clientDataJSON))
authenticatorData = new Uint8Array(auth.response.authenticatorData)
auth_msg = new Uint8Array([ ...authenticatorData, ...clientDataHash])
hex(auth_msg)
"49960de5880e..."
Since the server has stored the public key as well,
it can validate the signature and trust that this user still has the same hardware
token in their possession.
The server must also verify that the clientDataHash matches the challenge and
site that it sent (not shown).
echo 3045022100e009d46c5c09310c130fb5e1204e20d9dc6f273f855c6c5535f985a1ac6ea08202203fe8996791d5cb078d65e66f79862ad04e8e4f41e8315e26e5c07dd32769c7f1 \
| xxd -p -r > auth-sig.bin
echo 49960de5880e8c687434170f6476605b8fe4aeb9a28632c7995cf3ba831d976301000000266c1e352b4c44c97bb49ff117e3b38491d9c34409672bb544a042ddda97b16d98 \
| xxd -p -r > auth-msg.bin

openssl dgst \
    -sha256 \
    -verify site-key.pem \
    -signature auth-sig.bin \
    auth-msg.bin
ssh
If you have a recent Linux install, you probably already have support for
the ecdsa-sk and ec25519-sk key types in ssh-keygen. If not,
this guide from Jeroen van Kessel
is a good walkthrough on building and installing the updated packages.
Enroll
The way ssh implements u2f is slightly different from the WebAuthn technique:
it does not create a per-host specific key, so the credId equivilant is the
private key, and the challenge is derived from the ssh session hash,
not a server generated value.
Create a key as usual, specifying the a Security Key ecdsa-sk or ec25519-sk
type so that it will talk to the hardware token:
ssh-keygen -t ecdsa-sk -i ~/.ssh/id_sk
You probably want to provide a password for the key; without a password an
adversary only needs the hardware token to be able to make use of the new key,
which makes it a single factor rather than a two-factor. The password will
be used when ssh'ing to a remote host using this identity or adding the identity
to your ssh-agent with ssh-add.
The ~/.ssh/id_sk.pub can be added to the ~/.ssh/authorized_keys of
all of the hosts where you want to use this key, as usual, assuming the host
has also been upgraded to OpenSSH 8.2 or neweer.
Attestation
ssh-keygen has an -O write-attestation=attest.bin option, although
it is not in the normal format. And since it includes the credential ID
as part of the attestation, it essentially leaks the password protected
part of the private key:
May be used at key generation time to record the attestation data returned from FIDO tokens during key generation. Please note that this information is potentially sensitive. By default, this information is discarded.
I haven't explored how to parse the file or make use of this data. It would be useful to collate which identities are tied to which keys, so that they can be revoked if a hardware token is lost, but not at the risk of leaking the sensitive parts of private keys.
Authentication
When connecting to the remote server, the local ssh and remote sshd
negotiate an ephermeral Diffie-Hellman session key that neither can control.
To prove that the local ssh has access to the user's private key, it
signs this key, along with some session parameters, with the private key.
The server can validate that against the public key that it has for the
user in their ~/.ssh/authorized_keys file.
With the security key identity types, the local ssh forks the ssh-sk-helper
program to talk to the hardware token. ssh provides the helper with the
decrypted ~/.ssh/id_sk file and the hash of the session parameters.
The hardware token uses the id_sk as the credId to re-derive the
real private key, and the session hash as the challenge to sign to prove
that it has access to the same private key. Depending on the key
parameters, ssh-sk-helper might ask for a physical presence check.
You can use ssh-agent with -sk identities as well. In this case
ssh-agent forks the ssh-sk-helper each time a request is made for
one of the hardware-backed keys. I'm having a problem right now that it
doesn't prompt for a physical presence check unless ssh-agent is in
the foreground, although I think this is a configuration error on my part.