Yubikey
Edward Snowden says to trust in encryption, but you still need to worry about the security of the computer systems that run it:
Encryption works. Properly implemented strong crypto systems are one of the few things that you can rely on. Unfortunately, endpoint security is so terrifically weak that NSA can frequently find ways around it.
If you're worried that you're not paranoid enough about your communications security and want to improve your OpSec, it is actually fairly easy to go "full-Snowden" with hardware storage of your PGP secret keys. The Yubico Yubikey-Neo and Neo-N USB tokens are a neat (and cheap) way to keep your keys locked in a hardware device rather than stored as a file on your harddrive. The hardware tokens are compatible with the OpenPGP card protocol, which recent versions of gnupg support out-of-the-box. All of the public-key cryptography happens inside the tamper-proof device, so your secret key is never decrypted in the memory nor stored on disk of your machine.
Software
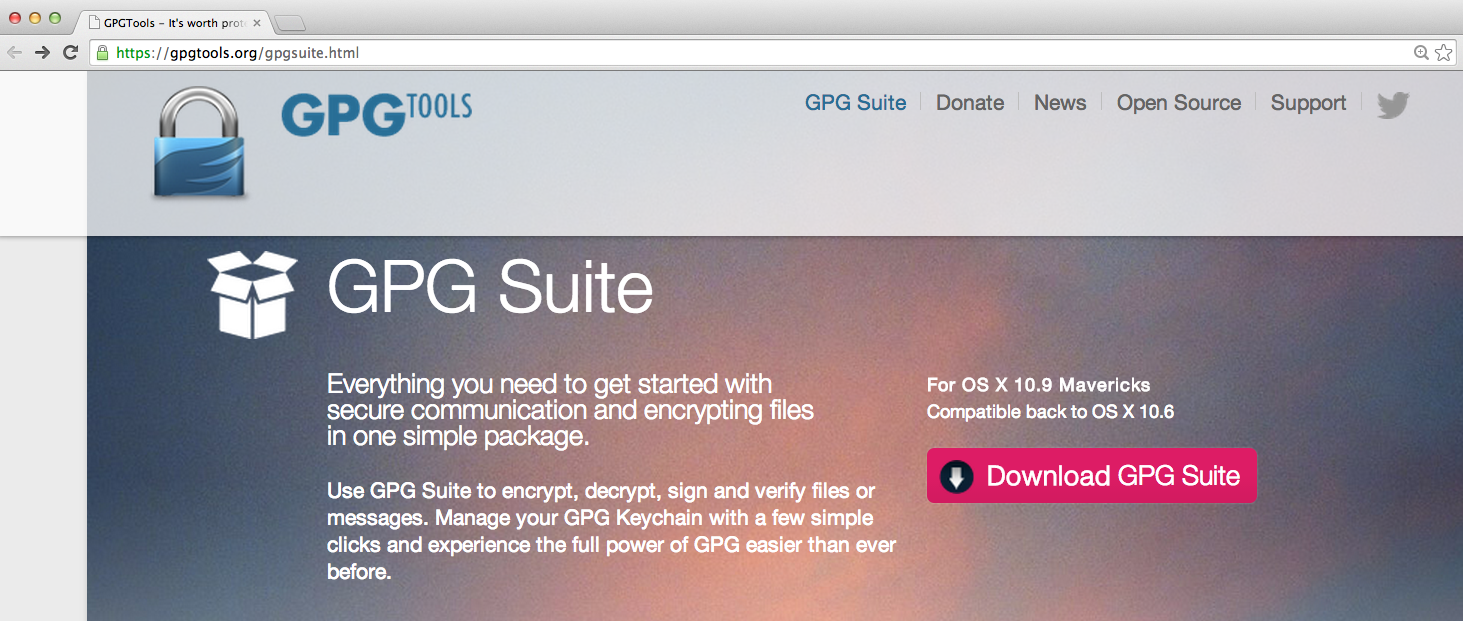
GPGTools provides a very nice key management GUI as well as a plug-in for Apple Mail.app. It also bundles the commandline version of gnupg 2.0.22, which you will need for doing some specialized functions.
Note that there is a bug in OS X Yosemite related to GPG card tokens not working.
Create your key
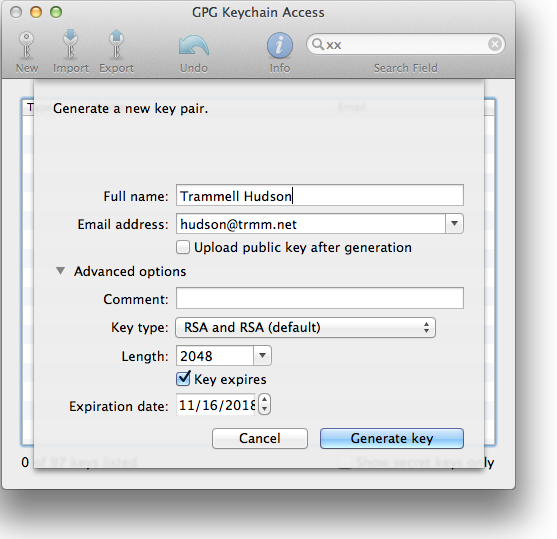
Run the GPG Keychain Access tool that the suite installed in /Applications and click the New Key button. Fill in your name and email and select the key type. The older Yubikey devices support up to RSA2048, so the defaults of "RSA and RSA" with length 2048 are correct. Yubikey Nano 4 added support for 4096 bit keys in late 2015 and you can select that if you want longer keys. Both devices also support secure key generation in hardware, but this requires some further steps in the terminal and is beyond the scope of this tutorial.
Expiration dates aren't required, but they are good idea since nothing lasts forever. You can still decrypt old emails and documents, as well as verify signatures, with an expired key, but no one will send you new ones.
You will need to pick a pass-phrase for the key -- make it a good one since it is the only thing that protects your key file while it is on disk. This Passphrase FAQ has some suggestions for picking a memorable one. You'll only need to type it in during these key operations and when you sign other users' keys.
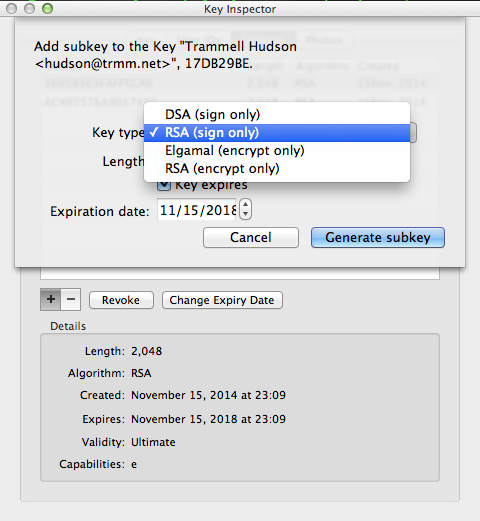
By default GPG Keychain tool create the primary key that has all access and one encryption subkey. For the cards you need to create a second subkey for signing. Double click on your key to bring up the Key Inspector window, select Subkeys and click + to create a new one of type RSA (sign only) and of length 2048.
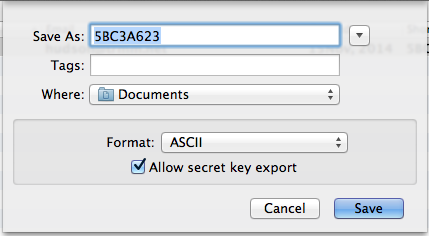
At this point you should export your key and save it somewhere safely offline. Right click on your key in the main window and select "Export" and check Allow secret key export. As part of moving the keys into the hardware token they will be deleted from your keyring. If you were to lose the Yubikey, you would not be able to recover the keys.
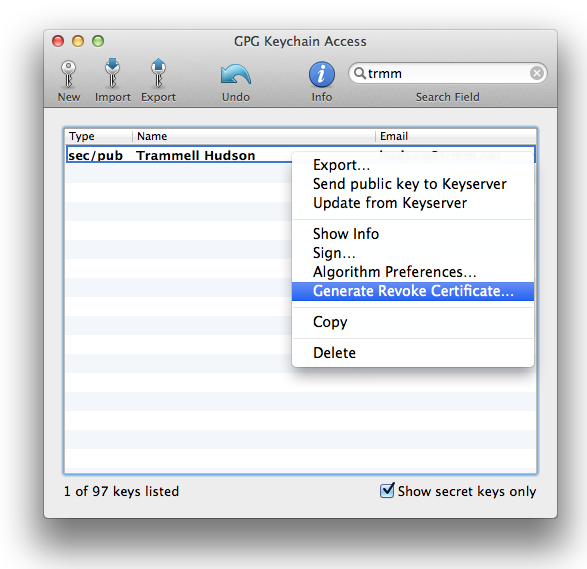
It is also worth creating a key revocation certificate. If you were to lose your keys or your passphrase, a pre-generated revocation certificate allows you to announce to the world that the key is no longer valid and should no longer be trusted. Right click on your key and save the revocation cert offline safely as well.
Lastly, you can also now select to Send public key to Keyserver, which will make your public key available to others. This is how they will be able to encrypt messages that only you will be able to read and how they will be able to verify signatures that you make.
Transfer keys to hardware
At this point we need to switch from the user-friendly GPG Keychain Access window to the gpg program in the terminal. Don't panic! Make note of your key's Short ID -- this is how it will be referenced with the command line utility. In this case mine is 17db29be
Plug in your Yubikey and open Terminal.app (in /Applications/Utilities) and get ready for classic 1990s user interfaces. In these examples, the text you type is in bold, % is the shell prompt and everything else is printed by the gpg program.
First you need to enable the OpenPGP Card / CCID mode. The ykpersonalize program can be downloaded from yubico on github. You only need to do this once and can delete the program once you've run it.
  % <b>~/Downloads/ykpers-1.16.0-mac/bin/ykpersonalize -m82</b>
  Firmware version 3.3.0 Touch level 1285 Program sequence 1
  The USB mode will be set to: 0x82
  Commit? (y/n) [n](n): <b>y</b>
Now let's edit your public key:
% <b>/usr/local/bin/gpg --edit-key 17db29be</b>
gpg (GnuPG/MacGPG2) 2.0.22; Copyright (C) 2013 Free Software Foundation, Inc.
This is free software: you are free to change and redistribute it.
There is NO WARRANTY, to the extent permitted by law.
Secret key is available.
pub 2048R/17DB29BE created: 2014-11-16 expires: 2018-11-16 usage: SC
trust: ultimate validity: ultimate
sub 2048R/FAFFECA6 created: 2014-11-16 expires: 2018-11-16 usage: E
sub 2048R/A9057450 created: 2014-11-16 expires: 2018-11-16 usage: S
[ultimate](ultimate) (1). Trammell Hudson <hudson@trmm.net>
gpg>
GnuPG is now waiting for another command from you. We need to switch to editing the secret key portion of this key with the <b>toggle</b> command and then select the first non-primary key with the <b>key</b> command.
gpg> <b>toggle</b>
sec 2048R/17DB29BE created: 2014-11-16 expires: 2018-11-16
ssb 2048R/FAFFECA6 created: 2014-11-16 expires: never
ssb 2048R/A9057450 created: 2014-11-16 expires: never
(1) Trammell Hudson <hudson@trmm.net>
gpg> <b>key 1</b>
sec 2048R/17DB29BE created: 2014-11-16 expires: 2018-11-16
ssb* 2048R/FAFFECA6 created: 2014-11-16 expires: never
ssb 2048R/A9057450 created: 2014-11-16 expires: never
(1) Trammell Hudson <hudson@trmm.net>
Now we'll run the <b>keytocard</b> command to copy this key to the card.
gpg> <b>keytocard</b>
Signature key ....: none
Encryption key....: none
Authentication key: none
Please select where to store the key:
(2) Encryption key
Your selection? <b>2</b>
You need a passphrase to unlock the secret key for
user: "Trammell Hudson <hudson@trmm.net>"
2048-bit RSA key, ID FAFFECA6, created 2014-11-16
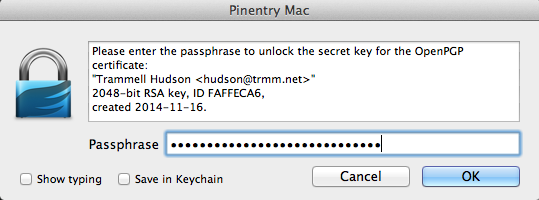
It will pop up a dialog prompting for the passphrase to unlock the key at this point. You'll need to enter your passphrase. Once your secret key is unlocked, it will need the Admin PIN for the hardware token. The default is 12345678; we will change it later. Once you've passed both of these dialogs, gnupg will print out the secret keys and show that key 1 has been copied to the card and no longer resides in the keyring:
  sec  2048R/17DB29BE  created: 2014-11-16  expires: 2018-11-16
  ssb* 2048R/FAFFECA6  created: 2014-11-16  expires: never
                       card-no: 0006 03036660
  ssb  2048R/A9057450  created: 2014-11-16  expires: never
  (1)  Trammell Hudson <hudson@trmm.net>
Now we need to deselect key 1, select key 2 and upload the signing key:
gpg> <b>key 1</b>
sec 2048R/17DB29BE created: 2014-11-16 expires: 2018-11-16
ssb 2048R/FAFFECA6 created: 2014-11-16 expires: never
card-no: 0006 03036660
ssb 2048R/A9057450 created: 2014-11-16 expires: never
(1) Trammell Hudson <hudson@trmm.net>
gpg> <b>key 2</b>
sec 2048R/17DB29BE created: 2014-11-16 expires: 2018-11-16
ssb 2048R/FAFFECA6 created: 2014-11-16 expires: never
card-no: 0006 03036660
ssb* 2048R/A9057450 created: 2014-11-16 expires: never
(1) Trammell Hudson <hudson@trmm.net>
gpg> <b>keytocard</b>
Signature key ....: none
Encryption key....: D04F 94C6 EF86 C150 9486 3F5C 2695 8563 FAFF ECA6
Authentication key: none
Please select where to store the key:
(1) Signature key
(3) Authentication key
Your selection? <b>1</b>
You need a passphrase to unlock the secret key for
user: "Trammell Hudson <hudson@trmm.net>"
2048-bit RSA key, ID A9057450, created 2014-11-16
Unlock the key as before. You won't need the admin PIN a second time since the token is unlocked.
  sec  2048R/17DB29BE  created: 2014-11-16  expires: 2018-11-16
  ssb  2048R/FAFFECA6  created: 2014-11-16  expires: never
                       card-no: 0006 03036660
  ssb* 2048R/A9057450  created: 2014-11-16  expires: never
                       card-no: 0006 03036660
  (1)  Trammell Hudson <hudson@trmm.net>
Now both keys are transferred to the card. Save the changes to the secret key on disk and exit gnupg:
gpg> <b>save</b>
Set hardware PINs
Still in the terminal, we'll use GnuPG to edit the card values. Your values might differ slightly.
% <b>/usr/local/bin/gpg --card-edit</b>
Application ID ...: D2760001240102000006030366600000
Version ..........: 2.0
Manufacturer .....: unknown
Serial number ....: 03036660
Name of cardholder: Trammell Hudson
Language prefs ...: [set](not)
Sex ..............: unspecified
URL of public key : https://pgp.mit.edu/pks/lookup?op=get&search=0xB65BFE540DEF86C0
Login data .......: hudson@trmm.net
Signature PIN ....: forced
Key attributes ...: 2048R 2048R 2048R
Max. PIN lengths .: 127 127 127
PIN retry counter : 3 3 3
Signature counter : 12
Signature key ....: 7EBB 6AFB 7B36 B4EE 39AD 2EE1 AC49 5576 A905 7450
created ....: 2014-11-16 04:11:18
Encryption key....: D04F 94C6 EF86 C150 9486 3F5C 2695 8563 FAFF ECA6
created ....: 2014-11-16 04:09:21
Authentication key: 8175 10FD F418 2B9B 50BF DB03 DD20 72FC C749 00F0
created ....: 2014-11-16 03:55:59
General key info..:
pub 2048R/A9057450 2014-11-16 Trammell Hudson <hudson@trmm.net>
sec 2048R/17DB29BE created: 2014-11-16 expires: 2018-11-16
ssb> 2048R/FAFFECA6 created: 2014-11-16 expires: 2018-11-16
card-no: 0006 03036660
ssb> 2048R/A9057450 created: 2014-11-16 expires: 2018-11-16
card-no: 0006 03036660
gpg/card>
Switch to Admin mode and change the PIN:
  gpg/card> <b>admin</b>
  Admin commands are allowed
  gpg/card> <b>passwd</b>
  gpg: OpenPGP card no. D2760001240102000006030366600000 detected
  1 - change PIN
  2 - unblock PIN
  3 - change Admin PIN
  4 - set the Reset Code
  Q - quit
  Your selection? <b>1</b>
A dialog box should pop up asking for the current pin; the default is 123456. The new pin must be at least 6 digits long or it will give you an error:
Error changing the PIN: Conditions of use not satisfied
If you have satisfied the condition, you'll get a success message:
PIN changed.
Repeat for the Admin PIN; this one must be 8 digits or longer.
Test Apple Mail
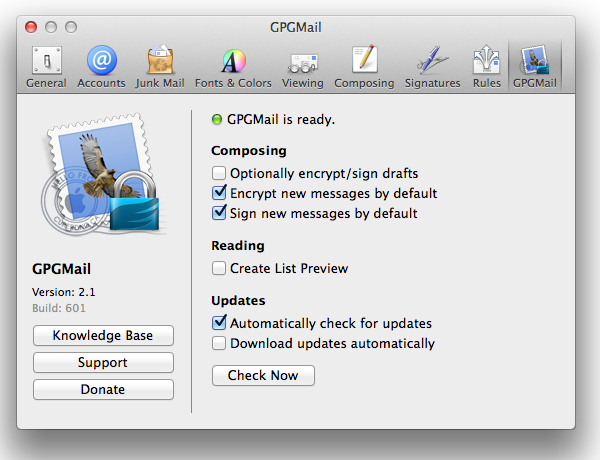
Quit and restart Apple Mail. There should be a new preferences pane for GPGMail. Encrypting by default is a good idea.
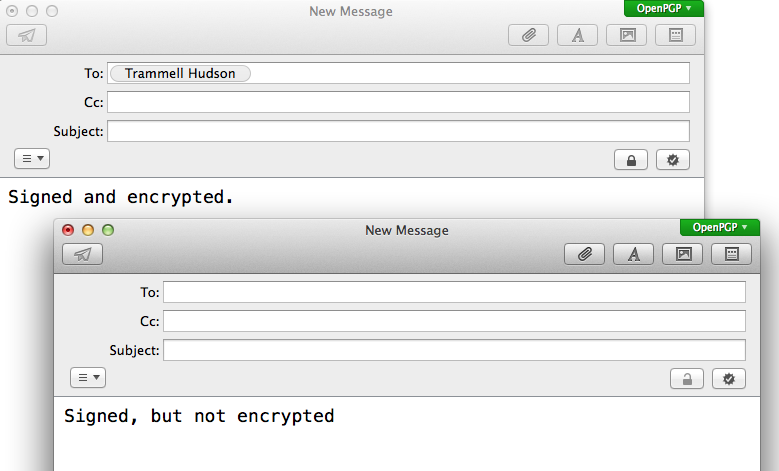
When you create a new message, there should be an OpenPGP flag on the upper corner of the compose window and two new buttons that indicate Encrypted and Signed. If you have the public key for the recipient and have selected to default to encryption, the button should automatically be selected.
gpg-agent and ssh
You can also use the GPG Authentiation key stored in the Yubikey for ssh authentication. gpg-agent can be used in place of ssh-agent; when you login to a remote host it will prompt you for your PIN (either via a popup or on the terminal). My ~/.gnupg/gpg-agent.conf contains:
pinentry-program /usr/local/MacGPG2/libexec/pinentrymac.app/Contents/MacOS/pinentry-mac
enable-ssh-support
write-env-file
use-standard-socket
And I have added these lines to my ~/.profile to configure ssh to talk to gpg-agent:
if [ -r "~/.gpg-agent-info" ]; then
     . "~.gpg-agent-info"
fi
To extract the public key for adding to ~/.ssh/authorized_keys on the remote side, run ssh-add -L. it should print something like:
ssh-rsa AAAAB3Nza[...](...) cardno:000603036660
Now What?
- Encourage your friends to switch to encrypted email
- Go to a CryptoParty and sign each others keys.
- Signing other people's keys
- Publishing to keyserver.
