NERF
 The LinuxBoot project (formerly NERF) is a collaboration between Google, Facebook, Horizon Computing Solutions, and Two Sigma that aims to build an open, customizable, and slightly more secure firmware for server machines based on Linux. It supports different runtimes, like the Heads firmware or Google's NERF.
Unlike coreboot, LinuxBoot doesn't attempt to replace the chipset initialization code with opensource. Instead it retains the vendor PEI (Pre-EFI environment) code as well as the signed ACM (authenticated code modules) that Intel provides for establishing the TXT (trusted execution environment). The LinuxBoot firmware replaces the DXE (Driver Execution Environment) portion of UEFI with a few open source wrappers, the Linux Kernel and a flexible initrd based runtime.
For more information about LinuxBoot, you can read my LinuxBoot talk at 34C3 or go to https://linuxboot.org/
Advantages of NERF/Heads
This has many advantages over the vendor UEFI firmware, many of which are explained in my 33c3 talk on Heads:
-
NERF is significantly faster to startup: the Heads interactive bash shell is ready in about 30 seconds after power on, compared to around 8 minutes for UEFI to boot into grub to load Linux.
-
NERF is significantly more flexible: it can use any Linux supported filesystem or device driver, execute Linux shell scripts to perform remote attestation over secure network protocols, mount encrypted drives, etc. This flexibility allows the firmware to easily be incorporated into a cloud provisioning system.
- NERF is potentially more secure: the Linux devices drivers and filesystems have had significantly more scrutiny than the UEFI implementations, and the reproducible builds allow better remote attestation or TPM sealing. Users can apply patches and build their own versions as well, instead of waiting for vendor update cycles.
- NERF has a significantly smaller amount of untrusted binary blobs. Only a few hundred KB of closed-source code remain, compared to the 32 MB of UEFI binaries.
The downsides of NERF are similar to those of coreboot: there are currently no vendors who support it and it requires physical access to the SPI flash chip to perform the initial installation. Additionally, the kexec based boot loader isn't able to startup Windows or non-Linux kernels, but that is less significant for most clouds.
Installing on a Winterfel OCP node
TODO: Need to document this.
Installing on an Intel S2600wf server mainboard
 Preliminary notes -- looks promising with lots of space for Heads and NERF.
Installing on a Dell R630
The current status (2017-09-20) is that most things work, with the major exception of SMP and USB, and the minor exception of the IOMMU. Heads/NERF specific issues are tracked on here: https://github.com/osresearch/heads/labels/nerf
Like any firmware modification project, this has potential risk of bricking your machine or causing other problems.
Removing the mainboard
 The first installation (and recovery from a bad firmware flash) requires physical access to the underside of the mainboard to get to the SPI flash chip. On the top of the board it is necessary to remove most every connector, although the CPU and memory can remain installed.
- All seven fans
- PERC RAID controller
- Front panel SATA connector and its power plug
- Front panel data connectors
- Both power supplies
- PCIe riser You can keep the quad ethernet attached. Once everything else has beenremoved, lift up on the two blue pegs and slide the entire mainboard forward. It should come free and you can lift it out of the case.
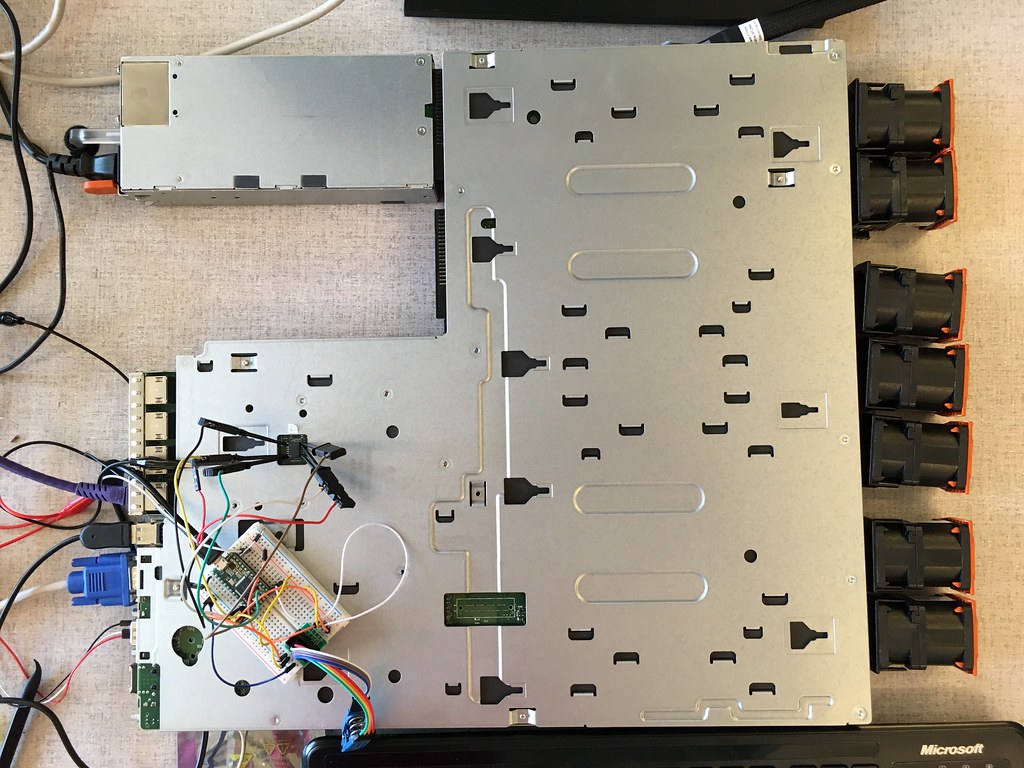 Carefully flip it over and it should rest on the stand-offs on either side of the memory. You can re-install the fans and power supply at this time, but don’t plug it into power yet.
Connecting to the SPI flash
 Connect your flash programmer to the 16-SOIC with either a chip-clip or micro-grabbers. The six pins that you need to connect are:
      NC ---- 1 o     16 --- CLK
Vcc (3v)- 2   W   15 --- DI
      NC ---- 3   I   14 --- NC
      NC ---- 4   N   13 --- NC
      NC ---- 5   B   12 --- NC
      NC ---- 6   O   11 --- NC
     /CS ---- 7   N   10 --- GND
      DO ---- 8   D    9 --- NC
I’m using my own Teensy 3 based SPI flash programmer, although there are likely better choices. One thing to note is that I’ve added a diode between the Teensy’s 3.3V output and the SPI flash chip. This prevents the Teensy from being powered by the mainboard during testing and means that I don’t have to keep unplugging the grabbers.
We need the Intel Management Engine (ME) firmware and the UEFI Pre-EFI (PEI) blobs from the existing ROM. Using what ever SPI flash reader, download the ROM. Download it a second time and compare it to the first time. Make sure there is actual data -- are there readable strings or is it all 0xFF? This has been tested with Dell’s 1.3.6 firmware. They might be portable to other versions, but I have not been able to verify this.
The makefile will extract the appropriate region from the vendor ROM -- you just need to drop the file in the right place in the build tree.
Building the NERF/Heads firmware
Install the necessary extra packages (some of which are specific to edk2 and are not reproducible):
    sudo apt update
    sudo apt install -y build-essential bc m4 bison flex zlib1g-dev \
        python git iasl uuid-dev nasm
Checkout the nerf branch, copy in your blobs and build the R630 config:
    git clone --branch nerf https://github.com/osresearch/heads
    cp r630.rom heads/blobs/r630/r630.rom
    cd heads
    make CONFIG=config/r630.config nerf.intermediate
If all goes well, after half an hour you’ll have a 16 MB nerf-r630.rom file with the acpi.cpio file bundled as the initramfs, the Heads runtime in the initrd.cpio.xz and the vendor PEI code to bring up the mainboard..
The Heads/NERF build takes quite a while since it aims to be reproducible regardless of your build system. This means that it downloads gcc, libc, Linux, edk2 and all of its dependencies to build them from source.
Flashing the firmware
 Using your flash programmer, upload all 16 MB to the SPI flash chip. With my tool I use the upload command and send the image to the serial port in another window.
TODO: document how to use flashrom or other tools.
Once it has been flashed, tri-state or disconnect the programmer from the chip.
Connect an actual RS232 serial adapter to the DB9 on the back of the mainboard at 115200 baud and power on the system. Once the vendor PEI finishes initializing memory it should start dumping Linux kernel init messages to the serial port. The serial console works, although it is slow and the ethernet is faster.
Interactive Heads shell
 The number 1 ethernet port (next to the USB port) will be setup as eth0 with the IP address 192.168.1.99. You can ssh in as root (no password) and start interacting with the system. Some commands that you might want to try:
Mounting the local disk (once you’ve flipped it back over and reinstalled the PERC):
    /sbin/insmod /lib/modules/megaraid_sas.ko
    mount -o ro /dev/sda1 /boot
Booting a test kernel (after scp’ing it to /tmp). Note that it might be necessary to pass acpi_rsdp=0x.... to the new kernel:
kexec -l --reuse-cmdline /tmp/bzImage
kexec -e
Flashing a new firmware image (which can brick your machine and require a SPI reflash if it doesn’t work): flashrom --programmer internal /tmp/nerf-r630.rom
External Links
- Ron Minnich's OSSNA2017 talk on NERF
- Ron Minnich's Open Source Summit 2017 talk on NERF: video, slides
- osresearch.net - Heads